
I hate that I waited forever to do a balloon cascade. After reading blog after blog, I continuously talked myself out of them every time… until now! I’m not going to say it’s the easiest thing in the world to do– it definitely takes some time and patience, but I can say that it is SO worth it. It’s such a show stopper, budget friendly, and really takes your party from good to grand. Oh, and the kids think I’m a rockstar.
I will say the most annoying thing I found when reading other blogs on how to do a balloon arch/cascade is no one will tell you exactly how many balloons you need and what size. It was incredibly frustrating sitting in an aisle trying to talk myself into and out of getting way more balloons than needed. After finishing the project, however, I now see why no one tells you exact numbers. It really can be a wide range depending on the look, size, and fullness that you want.
If you’re trying to make mine exactly, I’ll give you my best estimate. I spent roughly about $23 on balloons and still have about 50+ leftover. My cascasde was approximately 8 feet high and 8 feet across. Also, it’s not necessary, BUT I highly recommend having a second or third person helping you. My husband and I knocked everything out in about two hours, and we were both pretty pleased with how manageable it was.
Supplies
- Chicken wire
- (50-100) 5″ balloons
- (50) 9″ balloons
- (40-60) 12″ balloons
- Low Temp Glue Gun (with lots of sticks. I went through 8 sticks!)
- Clearing Packaging Tape
- Command Hooks (5lb weight capacity, I used a three pack)
- BALLOON PUMP– do not forget this!
*Optional: Glue Dots
A Few Tips After Doing This:
We did this the day before the party, and didn’t take it down until a day after the party, so I know for a fact the balloons will hold for at least 48 hours, so no need to wait like you have to do this a few hours before a party. Next, don’t get anything from Amazon, unless you want to pay more. I found everything for dollars cheaper at Wal-Mart & Lowes. I went to Party City for the 5″ and 9″ balloons, but bought all the 12″ balloons at Walmart. They’re larger quantities and cheaper prices. Again, I was making multiple trips anyway, so this was financially a better decision. If you’re doing 2+ balloon colors, you don’t need every color in every size. I ended up getting only light pink in 5″ balloons, light pink and dark pink in 9″ balloons, and dark pink & clear in 12″ balloons. Also, I loved the look and use of the smaller ballons for layering and filling gaps, so I intentionally half filled larger balloons. It all evens out and will look beautiful regardless!
Step 1: Chicken Wire
The first step is deciding how large you want it. I previously mentioned mine was about 8 feet high and 8 feet wide, so approximately 16 ft of chicken wire. My husband picked it up from Lowe’s, and according to him, got the one with “smaller holes” (aka, 1 inch). Determine the space you want to cover, then space your command hooks out accordingly. I used all three of my hooks at the top (horizontal part) of the cascade, and just let gravity do it’s thing when it transitioned from horizontal to vertical. Then, after resting the chicken wire on the hooks, I secured it with packaging tape to both the hooks & wall. You also don’t want the chickenwire to lie flat against the wall. Manipulate it so that it bubbles away from the wall. This will help 1.) give it a little more fullness, and 2.) make it much easier to loop the tape in and out when attaching balloons.

Step 2: Balloon Bouquets
This is where extra hands really comes in….. handy. Enough with the puns. I had my husband use the balloon pump to fill multiple colors and sizes of balloons while I used the low temp glue gun to make “bouquets”. It was extremely simple. You only need a dime size dab of glue and a few seconds of holding them together, and it comes together pretty quick and easily. I will say in the beginning, I really tried to switch up the sizes, colors, and arrangement of my bouquets, but learned that it doesn’t make a huge difference since you’ll be adding more balloons on top of your base layer later on. A simple three balloon bouquet in a triangular shape (with varying colors) would do just fine. Also, try to do your larger sized balloons for the bouquets. Your smaller balloons will be better used in later steps. Below is a sample of one of the “bouquets”– make sure the butt of the balloons are all facing the same side.

3. Forming your base layer
In other blogs I read, they always talked about a “tape-tail”, but never really elaborated on how to do that exactly. That being said, I ended up trying the best I could to make it both time efficient and sturdy. Using about 6 inches of packaging tape, I chose one balloon from the bouquet that would be my “anchor”, pinched the butt end of hit with tape, then weaved the excess tape through a hole in the chicken wire and fastened it down to the back side (example below). If the bouquet slouched a little bit, I used a small piece of tape to fasten another balloon in the bouquet to the chicken wire. I figured the second piece of tape didn’t have to be too sturdy because the first balloon tail was my “anchor”, and the second piece was just for looks. I didn’t have any problems with any balloons falling. Continue adding bouquet after bouquet until most of the chicken wire is covered. Don’t overlap them just yet. You’ll be adding more dimension in the next step.

4. Layering
Once most of your chicken wire is covered, you get to move onto the fun part! I’ve heard most people use glue dots for this (which would be way easier if I ever found them!), but instead I simply continued to use my low temp glue gun and an extension cord to add single balloons to my cascade to give it dimension– one less expense, right? I used my larger balloons to connect one bouquet to another, and then went in with the small balloons where I needed to fill gaps or break up spots too similar in colors. This is where the number of balloons you use can really vary. I probably could’ve stopped 20 balloons sooners, but fell in love more with each balloon I added, and therefore continued to make it fuller and fuller until my loving husband refused to pump another balloon. He really was such a trooper. Anyway, make sure you’re not attaching all the balloons side by side. Ideally, you’ll want to be gluing the bottom half of one balloon to the top half of another balloon so your cascade looks fuller with fewer balloons.
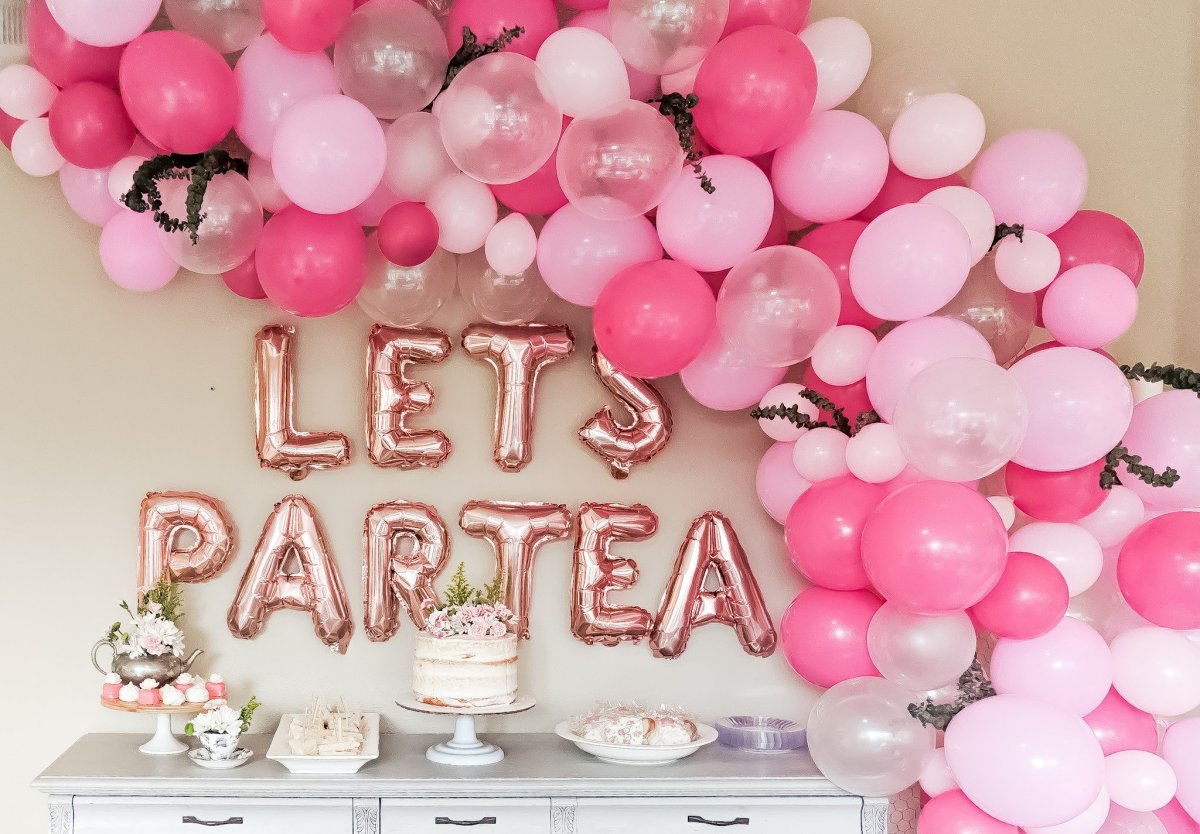
5. Greenery/Flowers
This doesn’t have to be an added expense! I had fake eucalyptus leaves as decor around the house that I used in my cascade, but any greenery from outside would definitely work! Cut a few twigs about a foot and a half long and insert them around your balloons. The balloons made the perfect little pockets for my branches, so I didn’t need to tape them; I just rested them in there, and called it a day! Here’s a look at the finished product!

If you have any other tips or questions, let me know! I have a ton of leftovers from this project that I can probably do it all again for half the cost (and considering my next child’s birthday is in two months, you bet I probably will.) Thanks!
To see the FULL Tea Party and details, make sure to visit my other post Par-Tea for Three!

One thought on “How To: Balloon Cascade”